Pages

Thursday, September 27, 2012

Whole Wheat Pancakes


Just in time for Saturday morning, America's favorite breakfast food....Pancakes!  I love this easy quick go to recipe that makes just enough for your Saturday morning needs.  I use fresh ground whole wheat flour but if the little tummies in your family aren't used to all whole wheat- try using half white half wheat!


Mix:
1 1/4 c buttermilk (see below)
1 egg
2T olive oil
1/2t salt
1 1/4c whole wheat flour (3/4c wheat & 1/2c white)
1t baking soda

Whisk ingredients and cook on a hot griddle.  The best part-use a cold stick of butter and rub it on the hot griddle to make it non-stick.  So Yummy!!


Don't have buttermilk laying around?  (who does?!?)  My friend who is a GENIUS baker taught me this little trick!  Check out her amazing blog for the BEST baking recipes ever-Seriously, the best!  www.fredellicious.blogspot.com 


Buttermilk: Combine 1T white vinegar and 1c milk in a bowl and let sit for 5 min.  It will get nice and chunky and there you have...BUTTERMILK!  Too easy :)


Ideas for healthy toppings: Try the ever popular peanut butter and jelly, some yummy fruit, or simple honey! 

Be creative and Enjoy!

STATS:
Better- There is just nothing like fresh right off the pan pancakes-your freezer breakfasts have nothing on this! *check*
Healthier-Whole wheat pancakes with fruit vs bleached flour pancakes with loads of syrup?  *check*

Cheaper-These few ingredients will cost you pennies on the dollar, 1 box of frozen pancakes is $2.50-$3.50 for about 12!  *check*

Sunday, September 23, 2012

No Vampires Here! Garlic


I love me some Garlic!!!  Not so much the breath after...but the flavor - Delish!  I got a bunch of bunches :) from the farm and wanted to preserve them.  So the thing about garlic is that its a low acid food so you can't can it-it'll grow infectious bacteria and make you sick-not worth it! You can however, dry it and freeze it!  Drying it is easy to do with either a dehydrator or just in your oven on the lowest temperature (140-170 degrees-if your oven won't got that low, just open the door to let a little bit of the heat out as you're drying).  After your garlic cloves are dried you can store them whole in an airtight container or bag or stick it in the blender and grind it up to make homemade garlic powder.

You can freeze it in several ways:  Freeze the whole cloves in the paper or take the paper off and freeze the peeled cloves for quicker use.  You can also crush your garlic into a mason jar, cover with vegetable oil (which won't freeze) and stick the jar in the freezer for minced garlic at your disposal.  You must store garlic in the freezer if it's not dried! Even in the fridge there's a high chance of bacterial growth. 

Be creative and Enjoy!


Fruit Snacks!

If you're a skilled gardener you may be looking for things to do with your copious amounts of zucchini!  I'm not.  I'm terrible!  Seriously, I once was given a pot that regulated the watering for you and I killed the plant in 3 weeks!  I'm that bad.  But...I saw this on pinterest and HAD to try them out!  The fruit FLAVORED gummy fruit snacks aren't even real food-they're gumified sugary stuff-yes they're good but....these are Amazing; and they're actually made from Zucchini!!!  They were so easy and you can do your own flavors and my kids love them!  Zucchini is in abundance right now at the beginning fall so you should be able to find great deals and stock up for the school year.


You'll need:
4 c peeled, chopped zucchini (I found that 1 med/lg zucchini is about 1 c)
3 c water
1 1/2 sugar
2 kool aid mix packets

Peel your zucchini really well (so there's no signs of healthy :)

Scoop out all the seeds with a spoon
Slice into long strips and then roughly chop into inch (or so)  pieces


Bring water, sugar, and kool aid in a pot and add zucchini right when sugar is dissolved.  Lower heat, cover, and let simmer for 30 min.


Drain and let cool for about 10 min
Layer in a dehydrator OR on a baking sheet lined with wax paper and dry in oven on lowest temperature (140-170 degrees-if your oven doesn't go that low leave the door open)  In my dehydrator I started them at about 11pm and they were perfect about 12 hours later!


These things are so good!!!  They're kind of like fruit leather consistency.


You're going to love these!!! 

Be Creative and Enjoy!

STATS:
Better? totally! These are sweet and delicious and they don't have a weird aftertaste like other fruit snacks.  *check*
Healthier? Do all moms have a secret stash of candy just for their enjoyment?  *check!*
Cheaper? Zucchini is cheap-especially right now and your only extra cost may be kool aid which can be purchased for $.10-$.20/packet.  *check*

Tuesday, September 18, 2012

Enchilada Seasoning Mix

I love a good recipe starter as much as the next person! Those little packets in the aisle of the supermarket give so many ideas for meals and help you to figure out that inevitable question of 'what's for dinner?' This recipe is for Enchilada Sauce Mix-the dry mix that you can store in an air tight container (a ziploc or tuperware container) and then mix as needed!  Love that! It's your own packet in the aisle of your pantry! 

Enchilada Sauce Mix
1/2 c corn starch
3/4 c chili powder
1tsp garlic powder
1 1/2 Tb salt
1/2tsp cumin
1/2tsp oregano
1Tb paprika

Mix 1T of mixture for every cup of tomato sauce.  (Throw some stewed tomatoes in the blender to make your own sauce).


Bring mixture to a boil and then simmer until it's reached your ideal thickness


Yummy!!


 Be creative and Enjoy!

STATS:
Better? This is as good as any enchilada seasoning I've ever had! *check*
Healthier? There's no additives or added salt. *check*
Cheaper? Those cute little packets are at least $1 for 2-3Tb of mix!  This mix will make 5 times using ingredients you already have in your house! *check*

Sunday, September 16, 2012

Kale Chips

So.....its late at night....you're loving you some reality tv.....but the salt craving has hit!  Those chips in the pantry are calling your name!  NEVER FEAR.....Kale chips are here!  They'll conquer that craving and be beneficial at the same time!  We love us some kale chips and they're fast and my favorite-easy!

Kale is a total Super food!!  It is low in calories, high in fiber, high in vitamins, and no fat! 

Kale chips are made from the leaves so pull the big veins out and put the leaves in a bowl.  Drizzle olive oil over the leaves and toss so all leaves are coated-another option is to lay them all out on a pan spray them with the olive oil. 

Lay the leaves out on a cookie sheet-this is the hardest part.  You don't want them to overlap so lay them out flat.

Sprinkle generously with salt.


 Bake at 400 degrees for 10 min.  The kale should be browning on the ends.  If its not all crispy yet let it cool and they'll finish crisping up. 

To preserve for the next couple of days eating keep in a paper bag or for longer storage you can vacuum pack them and then crisp them back up in the oven for 2 or 3 minutes. 

My kids-even my 2 year old- LOVE LOVE these!! 
Be creative and Enjoy!

STATS:
Better- Well they don't sell these in stores so...*check*
Healthier-These are super healthy!  google kale and be prepared to be blown away! *check*
Cheaper- Kale is cheap-especially if you buy it in season.  *check*

Thursday, September 13, 2012

Best BBQ Sauce

My 4 year old girl- ya the one with the snake in one hand and the princess crown in the other-asked for ribs for dinner!  Yum, ok!  I'm actually not a big barbecue fan but my homemade sauce...I love! And it's easy and can be mass produced to can or freeze.

This recipe makes 4 pint sized jars so half or quarter it if you don't need that much.


Homemade Barbecue Sauce
1 large onion
6 cloves of garlic
1/2 tsp red pepper flakes (optional)
1 tsp cumin
2T olive oil
1c brown sugar
1/4 c molasses
1 40oz bottle of ketchup
1/2 c apple cider vinegar
2T yellow mustard
3/4t sea salt
1/4t fresh ground black pepper
a few drops liquid smoke (optional)


I put the onion and garlic in the food processor and pulse it until its finely chopped; but advert thine eyes because when its chopped that onion burns!  Saute the chopped onion, garlic, red pepper flakes if you want them, and cumin in the olive oil until the onions are translucent.  Then add the brown sugar, molasses, ketchup, vinegar, mustard, salt, and pepper.  Bring to a boil and then simmer for at least 20 minutes but the longer you simmer the more flavor.  Add a few drops of liquid smoke if you want.  Be prepared...it's delicious!

Smother on....anything!  Be creative and enjoy!

as a side note-for the perfect corn- leave the husks on, soak in the sink for at least 10 minutes then throw on the grill for 15 to 20 minutes (until the corn is hot inside).  The water in the husks will steam it to perfection! 


Ideas: Add some honey for a honey bbq flavor or some mesquite seasoning.  You can also add your own dried red pepper flakes for your own custom spice!


STATS:
Better? Totally!  You can taste all the flavors and also have the option of adding a little here or there to totally customize your own signature sauce! *check*
Healthier? Besides the no preservatives...the sugar content in your sauce will be alot less also! *check*
Cheaper!? Yes!  Store bought sauce ranges from $2-$5.  You're making the $5 sauce for basically the recurring cost of the ketchup (buying 1 each of other ingredients you may not have ie. molasses and vinegar can be used for several batches). *check*


Bath tub Paints!!

My kids love a good fun bath and something I've found as a special activity, to make bath time last longer, and to help clean my tub are bath tub paints!  So fun and so simple!


Mix:
 1T cornstarch
1/4 c dish soap
and some food coloring
you also can add a little water after its all mixed if you want it to be a little thinner and go farther


Fun! Fun! Fun!

Friday, September 7, 2012

Fresh Veggies!!


For a few years now I have been an avid canner! I love getting produce for cheap and seeing how I can preserve it for my family.  I get cheap produce in a different few ways:

1. Sales!  Stores like Sunflower Market and Sprouts always have great deals on produce throughout the year.  I'll watch for sales like 8 for $1 grapefruit and then figure our how to can grapefruit!

2.  CSA is Community Supported Agriculture.  It is a program where you can purchase a share of a local farm's produce.  It's a great deal because the produce is local, fresh, and cheap!  With my CSA- through Miller Farms here in Colorado- I get to go to a farmer's market every week and fill up a large basket with whatever I want and it's all fresh picked and local! Score!

3.  One of my favorite websites is Pick Your Own.  This website has everything you could ever want to know about preserving food!  It's amazing!  One time I found a crazy deal on cantaloupe, plugged "cantaloupe" into the pick your own search and ended up making cantaloupe jam and fruit roll-ups!  The pick your own site will give you recipes and directions on how to preserve pretty much anything you can think of.  But...it also does something else!  It will give you information to all of the farms in your area (listed by county) that allow you to pick your own produce.  Any "pick your own" farm allows the public to come and harvest your own produce-usually at a smaller cost; plus its really fun and great for kids to be involved and see where their food is coming from!


Check out the pick your own website or your local CSA program-you won't regret it!

Spaghetti Sauce!

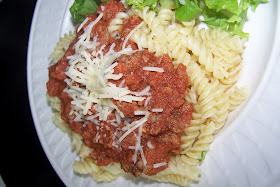
How to turn this...                   Into this!


My family loves them some spaghetti! Pretty much in every form with every meat option and on any pasta!  Because of that-making spaghetti sauce is a must for our pantry!  I am able to get wonderful locally grown tomatoes from our local farmers market through a program called CSA that I'll talk about in my next post.  At the end of the summer every year the canning is on! But... if you're not big into canning guess what?!? Sauce can be made per meal or made in bulk and frozen!  If you don't have fresh tomatoes laying around but you still want homemade sauce some canned stewed tomatoes work great!


First step...take those gorgeous tomatoes and stick them in a pot of boiling water.  This is a trick to peel the tomatoes easily and it will also get them semi cooked for your sauce. 


When the skin is cracked you know they're done.


Take them from the boiling water and put them directly into an ice bath.


Peel the skins and squeeze the water/juice out so you're left with the tomato meat.  If you like to drink tomato juice you can squeeze your tomatoes over a strainer in a bowl to save it and later run that through some cheesecloth for fresh homemade tomato juice-also great for a soup base so I hear!

Once you have your tomato meat you're ready to make your sauce.  This recipe is for 4 cups of tomato meat.  Multiply accordingly.

In food processor or blender combine:

4 cup stewed tomatoes
1 6oz can tomato paste
1/4 onion
1 clove garlic
1/4 t salt
1/8 fresh ground pepper
1t basil
1t oregano
1t thyme

1T brown sugar


The secret to the perfect sauce...the brown sugar!  The acid in the tomatoes leaves a bitter taste and the brown sugar counteracts the acid to take away that bitterness.


Yum Yum!  


Be creative and Enjoy!

Ideas-add some carrots, zucchini, or other veggies into the food processor to bulk up your sauce and hide the health from small or male mouths.

STATS:
Better?-Yes!  Your homemade sauce will actually taste like tomatoes!  Ragu has nothing on you! *check*
Healthier?- For sure!  Most pasta sauces are actually loaded with sugar!  Yuck! *check*
Cheaper?-Yes!  You can always find great deals on tomatoes or...grow some if you're capable-which my last 2 years of gardens have determined...I'm not :) *check*

Thursday, September 6, 2012

Farro Update

I had a request for other uses for the new grain in town- Farro!  This morning we made farro and eggs-so good together!  We also use farro in salads to give an added texture and good grain mixed with the lettuce and also serve it as a side (like rice) with a little butter mixed in.  I hope this gives you some more motivation to try this yummy food!

Never Fried Beans

The biggest fan requested item is here!   Healthy homemade never fried (re fried) beans!  We LOVE these things and make them often!  Mexican food is a common menu item and I love me a good bean and cheese burritos but re fried beans are anything but healthy!  I don't know what it is about Fire Fighters but they're all amazing cooks!  My husband brought this idea home from work and has perfected it! Everyone who has it is hooked!

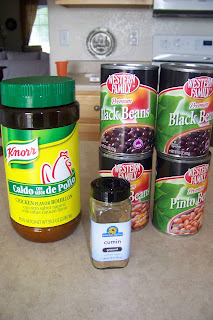
 Tonight I used canned beans but you can also use dry beans by soaking them over night-rinse and let sit in a crock pot on low for 6-8 hours before starting this process.  You can use any type of beans you have/like.  We love black so we mix black and pinto.  We use chicken bouillon and cumin as the seasonings and if we have fresh cilantro in the fridge that's good to chop up and throw in too!
My family of 5 solid food eaters will eat 4 cans of beans for dinner!  And the kids are 5 and under-Pigs! You can make more and freeze them for later!


Drain and rinse the canned beans

In a pot mix 4 cans rinsed beans, 2 cups water, 1T cumin and 2t chicken bouillon and bring to a boil then turn down to low and let simmer.
 Here's the refried tool-a potato masher!  Every 5 minutes or so mash the beans in the pot a few times.  As they simmer they'll soften and will keep mashing until you have the consistency you want.  Depending on what we're making we may totally mash for burritos or only partially mash for fajitas.
 Keep mashing/stirring until they're right for you and if you'd like more creamy beans add 1/2 cup milk at the end. 


Yummy!!


 Be creative and Enjoy!

Stats:
Better-Definitely!  These are so good, creamy and perfect! *check*
Healthier- Uhhhh....Ya! Beans are a great source of protein and fiber but refried beans are just that-fried and then REfried. Gross! They're usually high in sodium and fat.  *check*
Cheaper-1 can of refried beans are around $1.50 a can. Dried beans are $0.25/cup and Pre-cooked are $0.60/cup avg! *check*

Love 'em!!


Wednesday, September 5, 2012

Baby Rice Cereal

I had 4 amazing children in 5 years so I kind of feel like I didn't have time to really enjoy all the little steps that come.  So with my last I am really trying to soak it in! My little baby, Jaren, is 4 months old and the doctor recommended because of his acid reflux that we start him on solid foods.  I kind of dread this part a. because it means he's not an infant anymore and b.it means no more pure unsmelly breastmilk poop.  I hate poop.  So it's time to make a big batch of baby rice cereal.  I use oatmeal or brown rice and guess what....all I do is stick it in the blender!  I usually do about 2 cups of raw oats or brown rice and blend it on high-or put it in your food processor until it's powdery!  There you go! That's all I do.  It stores great in ziplocs or I usually keep a tuperware container ready in my cupboard.

IDEAS:
Mix it with a little applesauce for flavor!
Freeze it in the 2oz little ziploc containers to have ready made that's the perfect consistancy your little one and pop it in the microwave to heat or leave for the babysitter so you can have a date night! 

Be creative and Enjoy!
STATS:
Better-using what you already have and not having to go to the store to purchase something you've ran out of is always better-plus you can measure what you want and not have it spill out of those dumbly packaged boxes! *check*
Healthier-The stuff in the boxes does have preservatives and making it yourself cuts that out! *check*
Cheaper- 1 box of infant cereal ranges from $2.49 to $3.79 a box for Gerber!  Ouch!  *check*