So there I was a few months ago just enjoying a wonderful girl time conversation with my friends where I complain about the combination of how expensive things are and the horse-like appetite of my 2 year old. This particular day I had just spent some sort of ridiculous amount of time finding, cutting, and matching coupons to purchase the little individual junk filled yogurt cups for $.56 a cup instead of $.66 a cup. wahoo-big saver. When I heard magical words spoken to me, "you know you can make your own yogurt?" What?!?! It had NEVER occurred to me! Like ever! So I've spent the last few months trying and trying again until I was sure my method (with MUCH advice and collaboration from my dear wonderful friend Lauren) is one that you can do and always end up with yogurt in the end.
With no further adieu I give you: YOGURT!
What do you need? Milk and starter yogurt (store bought plain yogurt with live active cultures)
You start with milk. I use 2 percent because thats what my kids drink and I've tried whole but didn't see any difference in the yogurt so use what you have.
Pour 1/2 gallon milk into a large pot and heat on the lower end of med-hi
--------I do these next steps while i'm making my kids food or cleaning my kitchen because you want to stick around to check on your yogurt as it processes.
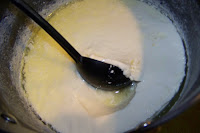
You need to heat the milk slowly until its almost boiling but NOT boiling. You do not want to burn the milk! You're waiting until a skin develops on top and then you've hit the right temperature
Take the pot off the heat to let cool. You need to let it cool until you can hold your finger in it and count to 10 without screaming. Seriously -that's how I measure :) -this takes around 30 min or so
At this point you need to stir in your starter yogurt. I use at least 1/2 cup yogurt for ever 1/2 gallon of milk. Be sure your yogurt is plain and has live active cultures. The milk has to be warm enough to let the cultures grow but not too hot that it'll kill them. You need to start with store bought yogurt but then each time you make it you can save some of your previous batch as your next starter.
Turn your oven on and let it heat for 2 min and then turn it off
Put a lid on your pot and wrap it up on a couple towel with love
Put in your oven and leave it for at least 7 hours. The longer you let it sit the more sour so if you like sour yogurt let it go-even 24 hours!
When your time is up take your pot out and behold....Yogurt! The clearish greenish liquid on top is the whey.
You can stir the whey back in for regular yogurt that is a runnier yogurt. You can also strain the whey out to make Greek Yogurt. Greek yogurt is a thicker yogurt that is growing in popularity because of its health factors. Whey holds the lactose and so Greek yogurt (without the whey) has far less carbs then regular yogurt and more protein per serving than regular yogurt. For more info you can go here.
To strain out the whey, spoon the yogurt into cheesecloth and let it drain.
Add jam, vanilla, or honey to sweeten.
Store in mason jars or Tupperware in your fridge.
Be creative and enjoy!
STATS:
Better: This stuff is so good! Its the real deal! *check*
Healthier: Did you know that Yoplait's Go-Gurt has MORE sugar than Coca-Cola!?!?!?! Homemade yogurt allows you to control the sugar and make it tasty but keep it healthy! *check*
Cheaper: Yes I know $.56 per container is a total STEAL but....1/2 gallon milk will make 2 pints greek yogurt which is around $5 depending on the brand and you just made it for about $1.75! *check*


No comments:
Post a Comment